
Making a 3D-looking racing game on a 2D canvas with pseudo 3D
Highway Driver is a racing game where you drive, seen from behind, along a highway that curves and climbs. You have to reach the next checkpoint before time runs out to get more time. The screen looks 3D, but there's no 3D library. It draws only trapezoids (four-point polygons) and flat pictures on a 640×360 2D canvas.
This is the pseudo 3D technique used by 1980s arcade racing games. The world is thought of in 3D coordinates, but there are no 3D models. The road is drawn as short pieces projected with perspective and joined into a strip, and cars and trees are flat pictures that only change size. The technique is explained well in Louis Gorenfeld's "Lou's Pseudo 3d Page" and Jake Gordon's "How to build a racing game" series, and this game follows the same frame.
The road is thousands of segments, each one a trapezoid
The road is divided into segments 200 units long. With 1m set to 166 units, a segment is about 1.2m, and one 2km section has a little over 1,600 segments. Each segment has just two values: how much it bends (curve) and the height of its end (y). Only 220 segments ahead of the current one are drawn. At 260km/h, about 60 segments go by per second.
Projection turns the near and far ends of a segment into screen coordinates. Dividing by the distance from the camera, cz, makes things smaller the farther they are.
const DEPTH = 1 / Math.tan((50 * Math.PI) / 180); // 100° field of view
const U = W / 2, Y0 = 168;                          // screen scale, horizon line

function project(p, camX, camY, camZ) {
  p.cz = p.z - camZ;            // distance from the camera
  p.s = DEPTH / p.cz;           // scale: smaller when farther
  p.X = U + p.s * (p.x - camX) * U;
  p.Y = Y0 - p.s * (p.y - camY) * U;
  p.Wd = p.s * ROAD * U;        // half road width on screen
}
The camera sits 1,000 units above the road, and the horizon is 168px from the top of the screen. Projecting the near and far ends of a segment gives two points and two widths. A trapezoid drawn from them is that segment's road. In practice a segment is drawn in a few layers: a grass band across the full screen width, a shoulder 1.17 times wider than the road, the road, and lane lines. Segment numbers are divided by 3, and depending on odd or even the grass, shoulder and road colors shift slightly, with lane lines drawn only on striped segments. The speed at which these stripes pass is what gives the sense of speed.
A curve is just a sideways push
Curves don't get real x coordinates per segment. While projecting segments from near to far, a sideways push is accumulated. With every segment, dx is added to the push x, and that segment's curve is added to dx. The push grows roughly with the square of the distance, so the road bends like a quadratic curve.
let x = 0, dx = -(base.curve * partInSeg); // start smoothly inside the first segment
for (let n = 0; n < DRAW; n++) {
  const s = segs[first + n];
  project(s.p1, camX - x, camY, camZ);
  project(s.p2, camX - x - dx, camY, camZ);
  x += dx;
  dx += s.curve;
}
Moving the camera the other way is the same as pushing the road, so the push is simply subtracted from the camera x during projection. The initial dx is reduced by how far we are into the current segment. Without that, the bend would change all at once when crossing a segment boundary and the road would jump sideways.
Road pieces are built in three parts: enter, hold and leave. The bend grows gradually on entry (easeIn) and smoothly returns to 0 on the way out (easeInOut). Hill height also rises and falls across the whole piece with easeInOut. Each scene has its own character: the canyon curves the most, the forest has the most hills, and the sunset bridge is long and gentle.
On curves the car is pushed outward. It isn't real physics; it just subtracts speed ratio × curve × 0.25 from the steering. The first values were tuned so that at 260km/h, steering fully held you on the sharpest curve. Later I made top speed rise by 20km/h at each checkpoint, up to 420km/h. In this formula the centrifugal push grows with the square of the speed ratio, and left that way, the sharpest curve you could hold at 420km/h would be 2.5, so in the canyon you'd do nothing but brake. So above 260km/h the push only grows by the square root. Even at 420km/h you can hold a curve of 3.1.
Drawing far to near lets hills hide the road
Hills are just different heights per segment, and the y in the projection turns them into screen heights. The camera height follows the road height under my car plus 1,000. The trouble is beyond a crest. The road past the top of a hill shouldn't be visible, but drawing segments near to far paints the distant road over the nearer hill.
So I split the order of projecting and drawing. The curve push has to accumulate from near to far, so projection goes near to far and builds a list. Drawing walks that list backward, from far to near. Like a painter who paints the distant background first and then paints nearer things over it (the painter's algorithm), the nearer hill is drawn later and covers the road behind it. Since each segment also paints a full-width grass band, the covered part comes out clean.
for (let n = list.length - 1; n >= 0; n--) { // far to near
  const { p1, p2 } = list[n];
  if (p1.cz <= DEPTH) continue;  // behind the camera
  if (p2.Y >= p1.Y) continue;    // back face beyond a crest: skip
  ctx.fillRect(left, p2.Y, width, p1.Y - p2.Y); // grass band, full width
  poly(roadColor, p1.X - p1.Wd, p1.Y, p1.X + p1.Wd, p1.Y,
                  p2.X + p2.Wd, p2.Y, p2.X - p2.Wd, p2.Y);
}
A segment whose far end is lower on screen than its near end is one going down beyond a crest. It would be an upside-down trapezoid, so it's skipped. That spot would be covered by a nearer hill anyway. Below the horizon everything is first filled with the fog color, so places beyond a crest where nothing is drawn don't look empty.
Distant segments are mixed with the fog color. For the distance ratio n / 220, they're mixed by 1 − exp(−(n/220)² × 5), so nearby segments stay almost unchanged and farther ones fade quickly. The mixing is split into 16 steps, and a color once mixed is remembered and reused. The road at the end of the 220 segments is almost fog colored, so new segments appearing there don't show. Roadside objects and cars lower their opacity in the farthest fifth of the range, so they fade in instead of popping up.
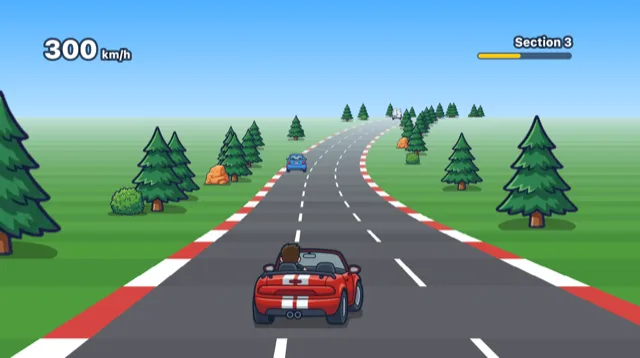
Cars and trees are drawn at their segment's scale
Roadside objects and other cars are flat pictures from a generated art atlas. Multiplying an object's world height by the scale s from projecting its segment gives its height on screen. It's drawn together with that segment. Since segments are drawn far to near, objects naturally end up in the right order, and trees and cars beyond a crest are hidden by the nearer hill.
Drawn as is, distant cars were barely visible. With true perspective, a car 60m ahead is about 14px, so cars popped into view only when close. So distant cars are drawn bigger than perspective says. They grow gradually up to 10 times the distance in front of my car, to at most 1.8×. Collisions are only checked at distances close enough to hit, so the exaggeration doesn't affect them.
Collisions use the same coordinates as drawing. Across, the road center is 0 and the road edges are ±1; along, it's the distance driven. If another car's rear is within my car's length ahead and their widths overlap, it's a hit. Roadside objects are measured at their pole or trunk, not the whole picture. A palm tree uses about a fifth of the picture's width for collisions, and a rock 85%.
Flat pictures caused their own problems. In pseudo 3D the vanishing point is the center of the screen, so objects on both sides of the road should show the side facing the center. The building picture shows its right side, so buildings on the right of the road looked wrong. I flipped only the right-hand row. Street lights at first had their lamps on both sides facing away from the road. I had flipped the left row without checking which way the picture faced. Now I look at which way a picture faces first, then decide which row to flip.
My car has three pictures: straight, turning left and turning right. It seemed one turning picture could just be mirrored for the other side, but then the driver, who sits on one side, hopped from side to side with every turn. I made the other direction as a separate picture. In the turning pictures the far wheels are 20 to 30px above the bottom of the picture, so a flat oval shadow in the middle made the front wheels look like they were floating. So the shadow for turning pictures is a polygon traced along where the wheels touch the ground.
The sun stayed in place
The sky, distant mountains and the sun aren't projected in 3D. They're infinitely far away, so they only need to slide sideways when the road curves. The curve times the number of segments driven that frame is accumulated into farX, and the distant mountain ridge is shifted by that much. Nearer hills and city silhouettes shift a little over twice as fast for a sense of depth.
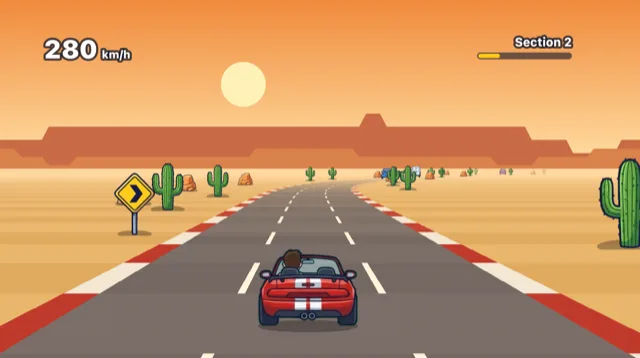
At first I shifted the sun and moon at 0.1 times the distant mountains. Then even after driving a long curve, the sun stayed in the same place, which looked wrong. The sun, moon and stars are as far away as the distant mountains, effectively infinitely far, so they have to shift at the same speed. Now they move by farX itself, with 2,400px as one loop, so whatever goes off one side comes back on the other.
const SKY_P = 2400; // one loop of the sky
const skyX = (x0) => {
  const a = view.left - 120;
  return a + ((((x0 - farX) - a) % SKY_P) + SKY_P) % SKY_P;
};
Every 2km the scene changes: coast, desert canyon, forest hills, sunset bridge, night city. For 300m before a checkpoint, the sky gradient and distant scenery blend into the next scene, so by the time you pass the arch the sky has already changed.
All the math is a few additions and one division per segment, and all that's drawn is trapezoids and pictures. With no 3D models, changing the look means remaking a single flat picture. In return, because they're flat pictures, I had to track myself which way each one faces and what else gets flipped when it's mirrored. Most of the trial and error came from there, not from the projection math.
References
- Louis Gorenfeld, Lou's Pseudo 3d Page: http://www.extentofthejam.com/pseudo/
- Jake Gordon, How to build a racing game: https://jakesgordon.com/writing/javascript-racer/
- Jake Gordon, How to build a racing game - curves: https://jakesgordon.com/writing/javascript-racer-v2-curves/
- Jake Gordon, How to build a racing game - hills: https://jakesgordon.com/writing/javascript-racer-v3-hills/
- Wikipedia, Painter's algorithm: https://en.wikipedia.org/wiki/Painter%27s_algorithm
Games from this post
 Highway DriverRace down a winding highway and reach each checkpoint in time!
Play
More posts
- Releasing the stone with momentum: a day of fixing Trebuchet Nov 3, 2026
- A jelly character that moves with five shapes instead of bones Nov 1, 2026
- Rolling a 3D die without a library and stopping on the face you want Nov 1, 2026
- The board flashed on iPhone every time a card moved Nov 1, 2026
- Making engine, wind and tire sounds with Web Audio and no sound files Nov 1, 2026